
4 minute read
Beta v5.0, the newest beta release for Powered by Nx product users, is available for download today! v5.0 is a full-featured release focused on cyber security, enhanced usability of existing features, and more admin capabilities.
Enhanced Usability & Admin Features
- Advanced Object Search
- Metadata Driven Archive Backup Options
- Web Page Proxy via Servers
- Resource Grouping
- Audio Mapping
- Desktop Client Automatic Updates
- Server Web Admin Interface Design
- Video Preview Thumbnails
Stronger Cyber Security Measures
- Two-Factor Authentication (2FA)
- Encrypted Archives
- More Secured Connections
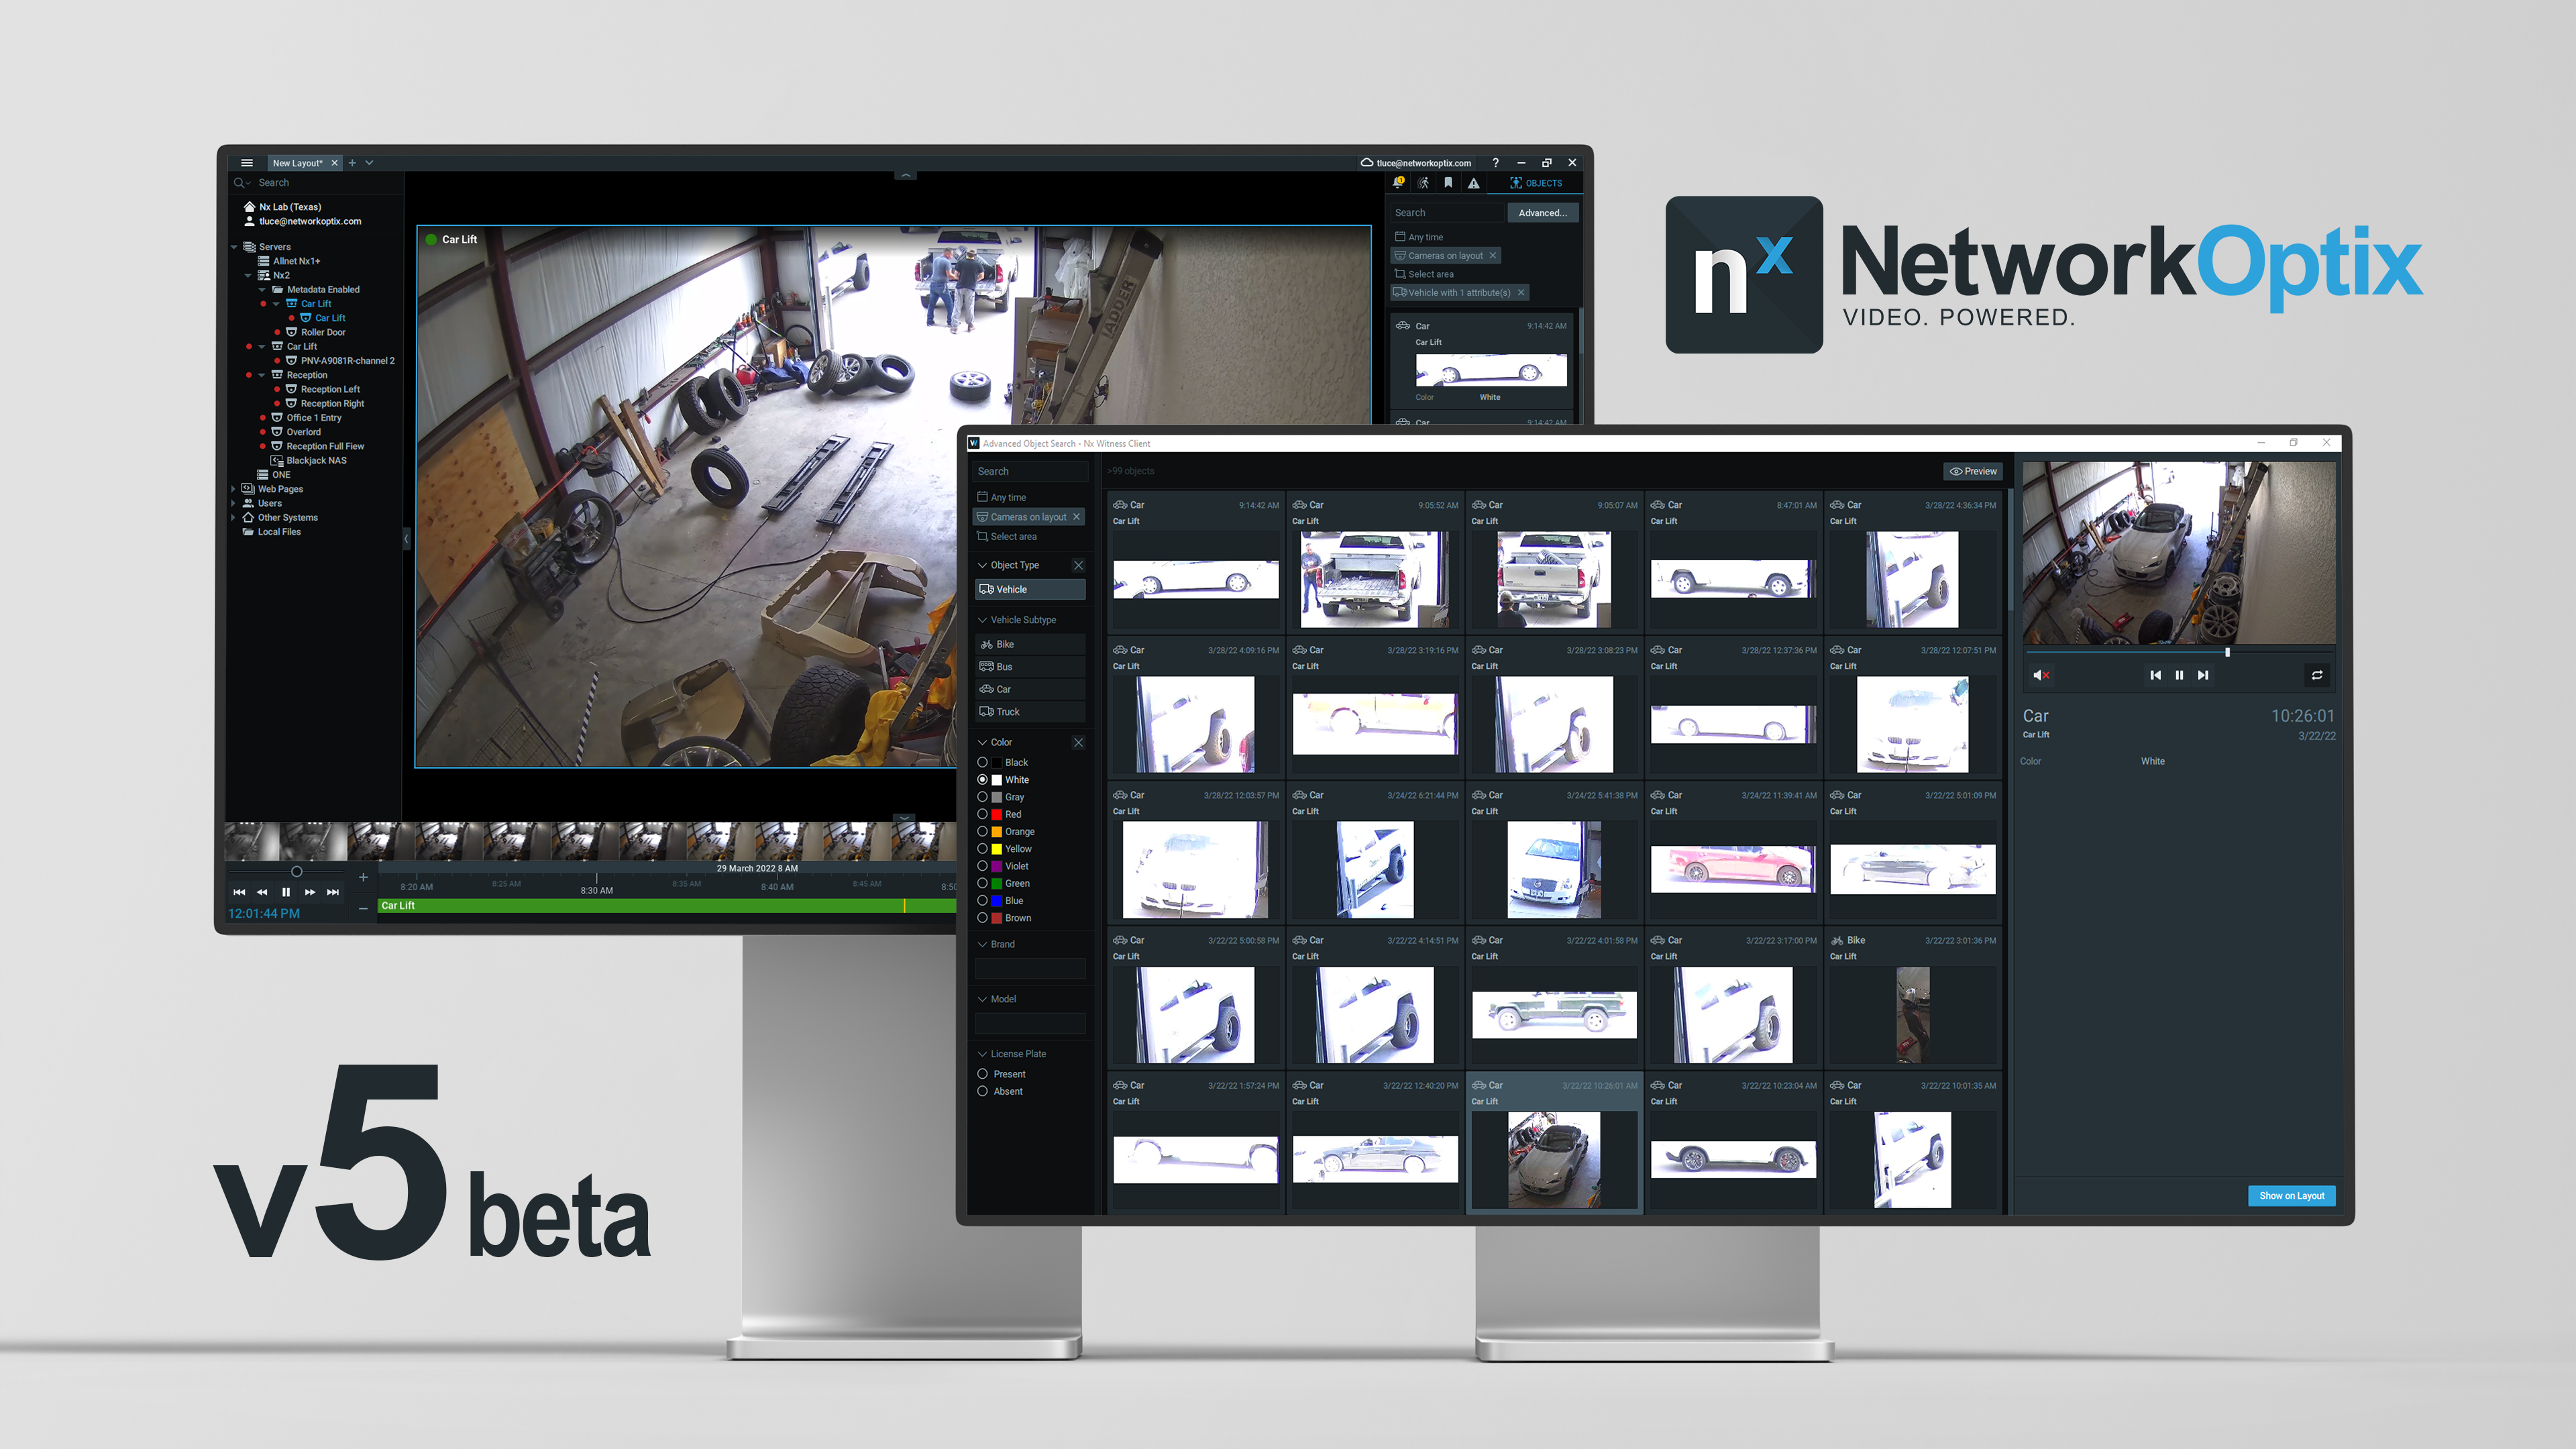
Advanced Object Search
Operators can now use the new Advanced Object Search to search for objects identified by analytics and stored in video archives by attributes (e.g. object type, color, gender, age, clothing, etc) in a new pop-out window.
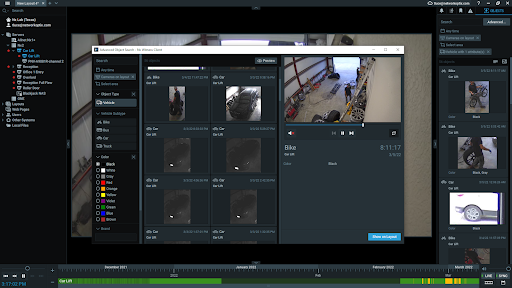
How Advanced Object Search Works:
- Navigate to the Notification & Objects Panel in the Desktop Interface.
- Click on the Object Icon
- Click on Advanced
- Use available filters to search based on object type and attribute (based on available plugins applied to camera(s) on the Viewing Grid.
Metadata-Driven Backup
In addition to being able to do real-time, scheduled, or on-demand backups, archive backups can now be configured to allow backup of recorded video archives based on associated system metadata – including motion, bookmarks, or objects.

How to Use Metadata-Driven Backup:
- In the Desktop client navigate to the Server Settings Dialog.
- Make sure you have configured a Backup location (local HDD, NAS, etc).
- Click on the Backup tab.
- Toggle on backup for your target camera(s).
- In the What to Backup field choose from the following options:
- All archive
- Motion
- Objects
- Video
- Bookmarks
- Motion, Objects
- Motion, Bookmarks
- Objects, Bookmarks
- Motion, Objects Bookmarks
- Repeat for all target cameras.
Web Page Proxy via Server
Local device or on-prem application web pages can be proxied via the Server application and viewed via a remote secured connection. This allows for easy, secure access to integrated security products / devices as well as management of underlying IT infrastructure and related services.
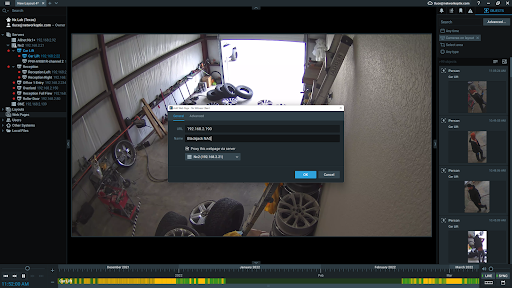
How Web Page Proxy via Server Works:
- In the Desktop client navigate to the Resource Panel, right-click on Web Pages and choose Add Web Page.
- In the Add Web Page dialog input the target URL of the device or service web page.
- In the Name field put the name of the device or service
- Make sure the Proxy this webpage via Server checkbox is checked.
- A dropdown box will appear – choose the Server that will be used to proxy this web page.
* Note: The Server used to proxy the web page must have access to the Internet. - When complete you will see the newly added proxied web page nested under the Server you designated in the Resource Panel.
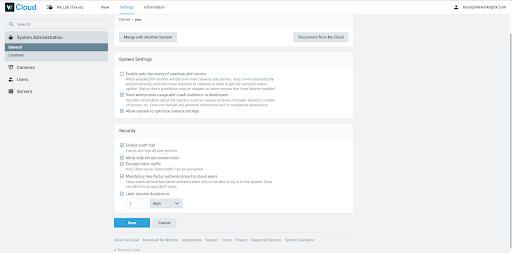
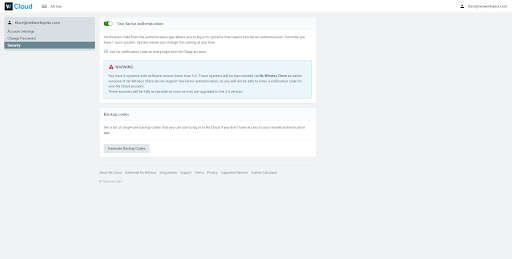
Two Factor Authentication (2FA)
Cloud-connected systems can now utilize two-factor authentication. This is a system-wide setting and forces all users with Cloud accounts to use an authentication app (Cloud supports Google Authenticator, Microsoft Authenticator, or Duo Mobile) to verify their identity before logging in to a System.
How to Set Up 2FA on a System:
- Make sure your System is connected to the Cloud.
- Navigate to the Cloud portal.
- Click on the tile for the System you would like to enable 2FA upon.
- You should now be in the General settings for System Administration.
- Under the Security section of the page check the Mandatory two-factor authentication for Cloud users checkbox.* Note: Cloud users without two-factor authentication will not be able to log in to any System with two-factor authentication enabled. Local and LDAP-based users will still be able to login locally.
How to Set Up 2FA on a Cloud Account:
- Navigate to the Cloud portal and log in using your credentials.
- Click on your email address in the top right corner and choose Account Settings
- On the left navigation panel choose Security
- Make sure the toggle for 2FA is toggled to on (green)
- Download a compatible Authentication app (Cloud supports Google Authenticator, Microsoft Authenticator, or Duo Mobile) to use for second-factor authentication when logging into 2FA enabled Systems.
- Make a copy of your Backup Codes and save them in a secure location. These codes will be required if you lose the ability to log in via your designated Authentication app.
Resource Grouping
Operators can now group resources (cameras, streams, encoders, web pages) in Nx Desktop which can be used in roles and permissions, and for faster navigation of large systems. Note: Groups are limited to the Server level and will disappear if dragged.
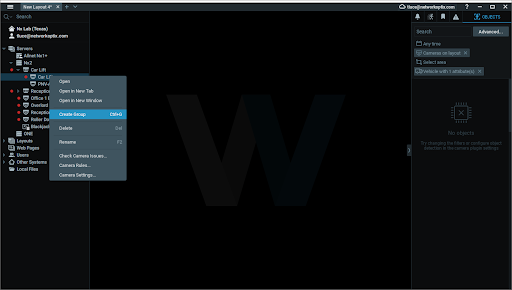
How to Create a Resource Group:
- In the Desktop Client navigate to the Resource Panel and right click on any camera, web page, I/O device, or encoder and choose Create Group.
- Drag and Drop additional resources into the Group as required.=
To Share a Resource Group:
- Resource Groups can be shared using the User Roles dialog accessible from the System Administration dialog.
Audio Mapping
Operators can use audio capabilities from different devices together. For example, an audio source from a camera or I/O module with a microphone can be used as an audio source for another camera. Another example – a 2-way audio button can be placed on a camera without a microphone and used with a different camera that has a speaker attached to it.
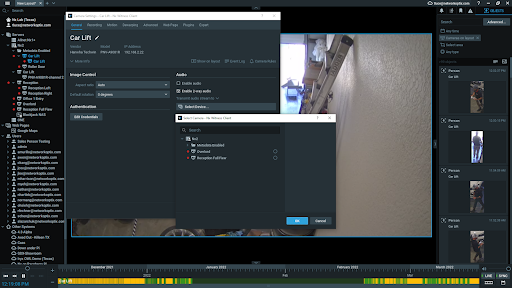
How to Use Audio Mapping:
To map audio from one camera / device for another camera / device:
- In the Desktop Client right click on the target device (camera or I/O with audio in)
- Under Audio – choose Use This Camera for Audio Output
- Choose Transmit audio stream to and then choose target device or devices
Desktop Client Automatic Updates
Nx Desktop client is no longer tied to the Nx Server or Nx Cloud applications when updating to a later version. When enabled, Nx Desktop will download any available updates in the background and will prompt users to restart to receive the latest version. Auto-updates are optional and users can choose to disable them.
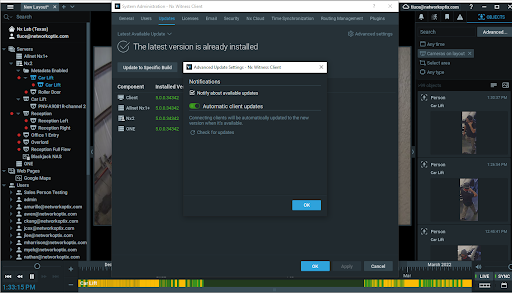
To Enable / Disable Automatic Updates:
- In the Desktop Client navigate to the System Administration Dialog.
- In the Updates tab click on Advanced Settings in the upper right corner.
- Check / Uncheck Notify about client updates
- Toggle Automatic client updates
Encrypted Archives
When enabled, recorded video archives will be encrypted and viewable only in the Desktop, Mobile, and Web clients. Works on any hard drive or storage medium. System owner creates the encryption key.
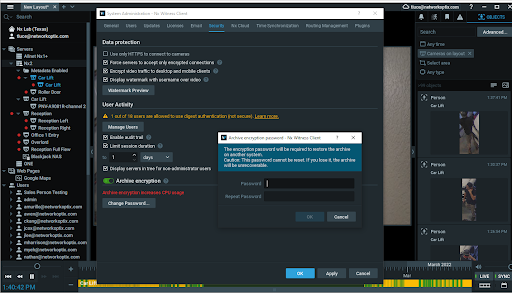
To Enable Archive Encryption:
- In the Desktop Client navigate to the System Administration Dialog.
- In the Security tab toggle on Archive Encryption.
- Create Archive Encryption Key in the form of a password. Make sure to store this password somewhere safe!
- Archives are encrypted using AES 128 in counter mode, using openssl EVP APIs (https://www.openssl.org/docs/man1.1.1/man3/EVP_aes_128_ctr.html)
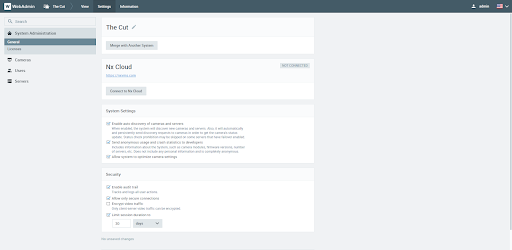
Server Web Admin Redesign
The Server Web Admin interface has been redesigned to allow administrators to add and remove users, as well as view detailed information about Servers, Cameras, and Licenses.
Video Preview Thumbnails
In Windows and MacOS Desktop clients users can now hover over the timeline to preview video in thumbnail format.
More Secured Connections
All VMS Server connections use SSL/TLS Certificate pinning to render man-in-the-middle attacks impossible. VMS Servers and Clients also use new session-based (bearer token) authentication by default.